4. Network Connection
The X AIR mixers offer convenient digital control of the various mixing functions in three different ways - via Ethernet LAN, or wirelessly as a Wifi Client or as an Access Point. Selection is made with the REMOTE switch [12]. You may view or change the network preferences for these on any of the X AIR remote control applications on the ’Setup/Network’ page.
4.1 IP Address and DHCP
Depending on the connection scenario, the X(R)18 offers up to 3 options for connecting a tablet or PC for software control – DHCP Client, DHCP Server, and fixed IP operation. Connection is achieved differently depending on which option you choose:
-
DHCP Client mode is available in Ethernet LAN or Wifi Client operation. The mixer will automatically request an IP lease from the DHCP server that owns the IP addresses in the network to which you are trying to connect.
-
DHCP Server (DHCPS) is optionally available for Ethernet LAN connections and is standard in Access Point operation. The mixer will own the IP addresses and provide IP leases to devices requesting access to that network. The mixer will always use IP address 192.168.1.1 and assign IP addresses 192.168.1.101 – 192.168.1.132 to its clients.
-
Static IP is available for Ethernet LAN and Wifi Client operation. The mixer will use the fixed (static) IP address, subnet mask and gateway that you specify for registering on the network. Make sure that the addresses you specify manually are not conflicting with any other addresses on the same network. We generally recommend using the DHCP mode, unless you have a very specific reason to set it up manually.
Note: Changing parameters of the currently selected connection mode will disconnect the software from the console. If the console is erroneously configured for a fixed IP address that is incompatible with the network it is connected to, the console will be inaccessible. In this case, one of the other two connection modes can be used to regain access and amend the settings. If that does not work, hold the Reset button for 2 seconds to return to default network settings.
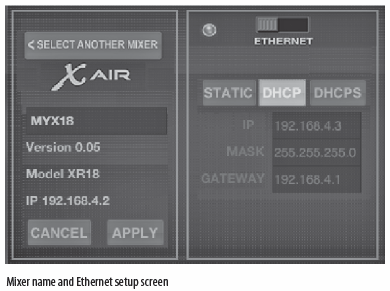
4.2 Ethernet/LAN
This mode supports DHCP Client (default), DHCP Server, and fixed IP operation. Note that if the X(R)18 is connected to a network where no DHCP server is present, the mixer will generate an automatic IP address (range 169.254.1.0 – 169.254.254.255). There are no security options for LAN connections, so any device in that network may take control of connected X(R)18 consoles. When connecting via LAN/Ethernet to a Wifi router, make sure the security settings of that router prevent unauthorized access.
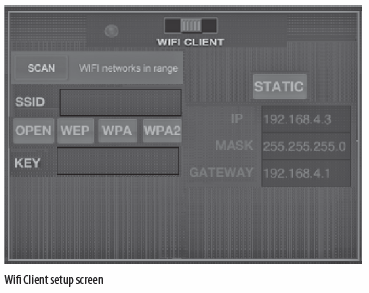
4.3 Wifi Client
This mode supports DHCP Client (default) and fixed IP operation. The X(R)18 can support WEP, WPA and WPA2 security mechanisms in Wifi Client mode and works on Wifi channels 1-11.
Correct SSID (network name) and password need to be supplied to connect to an existing network. WEP passwords have to be either 5 characters or 13 characters long. If the supplied SSID and password are incorrect, the mixer cannot be accessed. In this case the networking parameters have to be reset and another connection mode has to be used to regain access.
The Ethernet connection mode may be used for configuration of the Wifi Client mode. While being connected in Ethernet mode, the X AIR mixer can scan the available wireless networks and display their SSID network names, field strength and security method. By selecting the preferred wireless network, this information can be copied to the applications’ Wifi Client setup page automatically. You will then be prompted to fill in the security password of that network. After switching from Ethernet to Wifi Client mode, the mixer should connect to the selected wireless network automatically, and will be displayed by remote applications on any device connected to the same network.
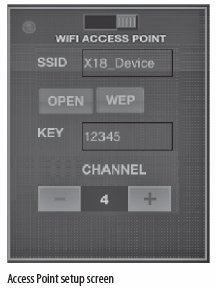
4.4 Access Point
This mode only supports DHCP Server operation with a maximum of 4 clients, working on Wifi channels 1-11. Security is supported via WEP 40-bit (5 ASCII characters) or WEP 104-bit (13 ASCII characters). By default, the mixer will use a network name consisting of the model name plus the last bits of the mixer’s unique MAC address (e.g. XR18-17-BE-C0). The default IP address is 192.168.1.1 and no security is engaged.
The control software is available for Android and iPad tablets as well as PC/Mac/Linux computers. Visit behringer.com to download the PC/Mac/Linux software. The tablet software can be downloaded from the app store on your device.
4.5 Getting Started
First Wifi remote connection to your X AIR mixer
- Download and install the remote control app for your device.
• Android smartphones/tablets: X AIR Android from the Google Play store
• Apple iPad: X AIR for iPad from the Apple* App store
• PC: X AIR EDIT for Windows, Mac or Linux from behringer.com
-
Set the REMOTE switch on your X AIR mixer to ACCESS POINT mode and power on the mixer.
-
Reset your X AIR mixer’s network settings to default values by holding the RESET button for 2 seconds. This is located in the small hole above the Wifi icon and requires a paper clip or similar tool to reach.
-
Switch your remote control device on and open the network settings.
Android smartphones/tablets
-
Start the Settings/Wireless & Networks dialog on your Android system.
-
Switch ’Wifi ’ on.
-
Click on ’Wifi ’ to select a network. From the list of networks, select your X AIR mixer’s name, e.g. “XR18-19-1B-07”. After a few seconds, the status should change to ’Connected’.
-
Open your X AIR for Android app and it will show similar information:
-
Click on ’Connect’ and tap on the mixer’s name in order to connect the app with your mixer. Note - if a warning pops up telling you that the mixer firmware is not supported, it is recommended to update the firmware to the latest version (see the X18 pages on behringer.com for details). You can, however, choose to connect anyway.
-
Once the app is connected to your mixer, all parameters will be loaded automatically. Enjoy exploring all mixing functions of your X AIR mixer remotely!
Apple iPad
-
Start the Settings/Wifi dialog on your iOS.
-
Switch ’Wifi’ on.
-
Select your X AIR mixer’s name from the list of networks, e.g. “XR18-19-1B-07”. After a couple of seconds, the status should change to ’Connected’, indicated by a check mark.
-
Open your X AIR for iPad app and it will show any X AIR mixers (’Devices’) found in that network, with their IP address, which in this case is 192.168.1.1.
-
Tap on the mixer’s icon to connect the app with your mixer. Note - if a warning pops up telling you that the mixer firmware is not supported, it is recommended to update the firmware to the latest version (see the X18 pages on behringer.com for details). You can, however, choose to connect anyway.
-
Once the app is connected to your mixer, all parameters will be loaded automatically. Enjoy exploring all mixing functions of your X AIR mixer remotely!
PC: X AIR EDIT for Windows, Mac or Linux
-
Open the Wireless Network Connections dialog on your operating system.
-
Make sure the ’WLAN’ or ’Wifi ’ adapter is switched on.
-
View the list of wireless networks and select your X AIR mixer’s name, e.g. “XR18-19-1B-07”. After a couple of seconds, the status should change to ’Connected’, indicated by a check mark.
-
Open your X AIR Editor for Win/Mac/Linux and click on ’Setup’. The list will show any X AIR mixers found in that network, with their name and IP address, which in this case is 192.168.1.1.
-
Click on your mixer’s name, e.g. “XR18-19-1B-07”, and confirm to synchronize from mixer to PC in order to connect the app with your mixer. If a warning pops up telling you that the mixer firmware is not supported, it is recommended to update the firmware to the latest version (see the X18 pages on behringer.com for details). You can, however, choose to connect anyway.
-
Once the app is connected to your mixer, all parameters will be transferred automatically. Enjoy exploring all mixing functions of your X AIR mixer remotely!